Be yourself; Everyone else is already taken.
— Oscar Wilde.
This is the first post on my new blog. I’m just getting this new blog going, so stay tuned for more. Subscribe below to get notified when I post new updates.
Be yourself; Everyone else is already taken.
— Oscar Wilde.
This is the first post on my new blog. I’m just getting this new blog going, so stay tuned for more. Subscribe below to get notified when I post new updates.
1. Point to Point Wireless bridge
Mode ini hanya mendukung satu titik access point nirkabel, artinya
komunikasi tersebut hanya terjadi antara dua unit Access point
sebagai bridge (jembatan). Access Point atau broadband AP akan bertindak hanya sebagai jembatan nirkabel dan
tidak akan menerima klien nirkabel lainnya. Sehingga apabila terdapat klien
notebook yang memiliki fungsi nirkabel dan ingin bergabung dengan AP
nirkabel tersebut, maka klien tersebut tidak akan bisa terhubung kecuali
bila terkoneksi langsung ke AP dengan menggunakan kabel ethernet.
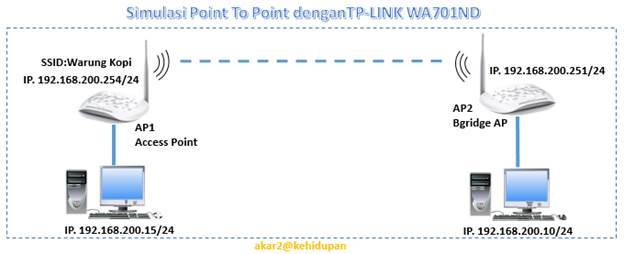
Konfigurasi AP1 pada mode Access Point
1. Hubungkan Access point (AP) dengan PC seperti gambar simulasi
diatas
2. Cek IP defauld pada AP. Untuk model TP-Link WA701ND IP defauld-nya
192.168.0.254
Untuk merubah IP pada AP, terlebih dahulu setting IP pada PC Client yang
akan terhubung ke AP satu segmen dengan AP. Dalam hal ini PC Client di set
192.168.0.15
3. Buka web browser pada PC Client dan masukkan IP access point
yaitu 192.168. 0.254.

4. Masukkan username dan password dengan “admin” ( nama
user ini dpat berbeda sesuai dengan tipe atau merk dari Access point).
5. Untuk melakukan perubahan IP pada AP, pilih menu Network, kemudian pilih
“LAN” , pilih type “Static IP” isikan IP address yang baru serta sesuaikan
Subnet Mask nya. kemudian simpan konfigurasi dengan klik Save.

Sistem akan meminta untuk melakukan reboot.
Karena IP AP1 telah berubah, selanjutnya sesuaikan juga IP PC client yang
terhubung. Sesuaikan dari 192.168.0.15 menjadi 192.168.200.15

6. Langkah Selanjutnya pilih Menu Operation Mode
kemudian pilih “Access Point” kemudian simpan konfigurasi
dengan klik Save.

Silahkan tekan tombol reboot jika diminta oleh sistem.
7. Langkah selanjutnya pilih tab “Wireless” kemudian “ Wireless Settings” ganti SSID dengan SSID yang sudah ditentukan
misal SSID untuk AP 1 adalah “Warung-Kopi-TKJ”. Seting
Region, Chanel (chaanel bisa juga dibuat auto). Simpan konfigurasi dengan
klik Save.

8. Selanjutnya untuk alasan keamanan koneksi, daftarkan Mac Address AP2
pada menu Wireless MAC Filtering pada tab “Wireless”. MAC address
biasanya ada di box perangkat atau bisa di lihat di menus tatus pada bagian atas.
Langkah untuk mendaftarkan MAC Address adalah pertama-tama tekan tombol enable pada halaman MAC Filtering, Filtering Rule nya
pilih Allow, selanjutnya tekan tombol Add New lengkapi dengan nomor MAC Address, simpan
konfigurasi dengan klik Save.


9. Langkah selanjutnya Disabe DHCP pada menu DHCP
setting.

Konfigurasi AP2 pada mode Bridge AP
1. Lakukan Langkah awal seperti pada AP2 (langkah 1 sampai dengan langkah 5)
sehingga IP AP2 menjadi 192.168.200.251 dan IP PC Client pada AP2 menjadi
192.168.200.10

2. Langkah selanjutnya Disabe DHCP pada menu DHCP
setting.

3. Pilih tab “Wireless” kemudan pilih Survey simpan
konfigurasi dengan klik Save.

Pilih Sinyal yang di dapat dari hasil survey, daftar hasil surver terlihat
seperi gambar berikut. Jika di temukan, silahkan pilih menuConnect. Selanjutnya tekan tombol Save untuk menyimpan.

4. Setelah selesai coba lakukan tes koneksi dengan menggunakan perintah
‘ping’ dari PC di LAN segment 1 ke LAN segment 2. Jika terhubung, maka
konfigurasi Wireless Bridge Point to Point telah berhasil.
This is an example post, originally published as part of Blogging University. Enroll in one of our ten programs, and start your blog right.
You’re going to publish a post today. Don’t worry about how your blog looks. Don’t worry if you haven’t given it a name yet, or you’re feeling overwhelmed. Just click the “New Post” button, and tell us why you’re here.
Why do this?
The post can be short or long, a personal intro to your life or a bloggy mission statement, a manifesto for the future or a simple outline of your the types of things you hope to publish.
To help you get started, here are a few questions:
You’re not locked into any of this; one of the wonderful things about blogs is how they constantly evolve as we learn, grow, and interact with one another — but it’s good to know where and why you started, and articulating your goals may just give you a few other post ideas.
Can’t think how to get started? Just write the first thing that pops into your head. Anne Lamott, author of a book on writing we love, says that you need to give yourself permission to write a “crappy first draft”. Anne makes a great point — just start writing, and worry about editing it later.
When you’re ready to publish, give your post three to five tags that describe your blog’s focus — writing, photography, fiction, parenting, food, cars, movies, sports, whatever. These tags will help others who care about your topics find you in the Reader. Make sure one of the tags is “zerotohero,” so other new bloggers can find you, too.
